Here’s how you can customize your iOS experience on your brand-new iPhone.

iOS 17, Apple’s latest software update for the iPhone, was released earlier this fall alongside the iPhone 15 and iPhone 15 Pro. Even though the phones have been out for a little over a month, you might be upgrading your phone just now. The new iPhone OS has lots of cool features, including StandBy, which turns your phone into a smart display, and Contact Posters, which bring full-screen visuals to your contacts and your call screen.
Read more: Do This Before Downloading iOS 17
Most of the biggest features are ready to use as soon as you start using iOS 17 on your supported iPhone. However, a few are disabled by default, so it’s your job to go into your settings and turn them on. To truly tap into the full potential of iOS 17, these are the settings you’ll want to configure as soon as you download it.
If you want to learn more about iOS 17, check out the best hidden iOS 17 features and everything else you need to know about iOS 17.
Turn on Face ID to browse privately in Safari
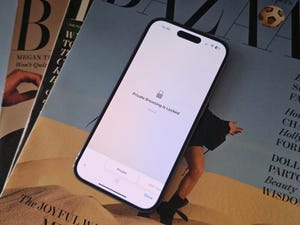
Safari has added several new privacy settings on iOS 17: You can now choose a different search engine (like DuckDuckGo) when privately browsing, automatically strip all tracking information from URLs, and securely share passwords with friends and family. And you can even lock your private browsing tabs in Safari — but you’ll need to toggle this setting on before you can use it.
In Settings, go to Safari and toggle on Require Face ID to Unlock Private Browsing. That’s all you need to do! If you want to test out the feature, open the Safari web browser and make your way to Private Browsing. If you attempt to browse privately, you’ll be asked to use Face ID to access your private tabs.
If Face ID doesn’t work, tap Unlock to enter your passcode.
Screenshots by Nelson Aguilar/CNETAutomatically delete your verification codes
We’ve talked about this iOS 17 feature extensively here at CNET, and for good reason. It’s very useful and cleans up the clutter of verification codes in your text messages, and it’s somewhat hidden in your settings. And oh yeah, it’s not enabled by default, so it’s up to you to turn it on.
Read more: iOS 17 Is Bringing a Fix for Those Two-Factor Authentication Codes Piling Up in Your Inbox
In the Settings app, go to Passwords > Password Options and toggle on Clean Up Automatically. Now, when you receive authentication notifications in Messages (or even in Mail), they’ll be automatically deleted from their respective applications — as long as you use the verification code with the autofill feature at the top of your keyboard. If you don’t use the autofill feature, the verification code will stay in your messages or emails.
The text message or email will disappear shortly after you use autofill.
Screenshots by Nelson Aguilar/CNETMake haptic feedback faster
After you perform certain actions on your iPhone — like long-press on your home screen to delete an application or even type on your keyboard — you should feel a tiny vibration underneath your fingertip — that’s haptic feedback. It’s how your phone interacts with you as you interact with it, meant to improve your experience. And with iOS 17, haptic feedback is a whole lot better.
If you want to make haptic feedback faster (snappier even), you can do so. In Settings > Accessibility > Touch > Haptic Touch, you can change the duration of haptic feedback: You can choose from Default, Fast and Slow. Underneath these options, you have an image of a flower that you can touch and hold down on to test the various haptic feedback options.
The flower image will blow up after you press and hold down on it to test out the haptic touch.
Screenshots by Nelson Aguilar/CNETEnable the level in your camera
If you want to take better photos, or at least straighter photos, the native Camera application on your iPhone has a new, somewhat hidden feature that adds a virtual horizontal level as you snap a photo. You’ll know the shot is level with the ground when it turns yellow and you feel the haptic feedback.
This feature isn’t enabled by default, so go to Settings > Camera and toggle on Level under the Composition section. Now when you take a photo, you should see a broken straight line in the middle of your screen. This is the level. Adjust your phone to make it yellow, signifying that it’s now level to the ground.
The level lives in the middle of your camera.
Screenshots by Nelson Aguilar/CNETInterested in the new iPhone 15, which will come shipped with iOS 17? Check out our comparison of the iPhone 15 and iPhone 14 and the best deals on the iPhone 15.


